A travers cet article, on verra comment créer un Web Services avec JAX-WS / CXF, Spring et Tomcat. On utilisera pour ce tutoriel :
- Eclipse pour le développement
- Maven pour la construction des dépendances
- Tomcat pour le déploiement
1. Dépendances
Créez un projet Web avec Maven sous Eclipse et ajoutez les dépendances suivantes à votre pom.xml :
<dependency> <groupId>org.springframework</groupId> <artifactId>spring-web</artifactId> <version>3.1.1.RELEASE</version> <scope>compile</scope> </dependency> <dependency> <groupId>org.springframework</groupId> <artifactId>spring-context</artifactId> <version>3.1.1.RELEASE</version> <scope>compile</scope> </dependency> <dependency> <groupId>org.apache.cxf</groupId> <artifactId>cxf-api</artifactId> <version>2.6.0</version> <scope>compile</scope> </dependency> <dependency> <groupId>org.apache.cxf</groupId> <artifactId>cxf-rt-frontend-jaxws</artifactId> <version>2.6.0</version> <scope>compile</scope> </dependency> <dependency> <groupId>org.apache.cxf</groupId> <artifactId>cxf-rt-transports-http</artifactId> <version>2.6.0</version> <scope>compile</scope> </dependency> <dependency> <groupId>org.springframework</groupId> <artifactId>spring-test</artifactId> <version>3.1.1.RELEASE</version> <scope>test</scope> </dependency>2. Configuration On commence par la configuration du fichier web.xml, on déclare la servlet de CXF CXFServlet et le listner de Spring ContextLoaderListener.
<context-param> <param-name>contextConfigLocation</param-name> <param-value>WEB-INF/applicationContext.xml</param-value> </context-param> <listener> <listener-class> org.springframework.web.context.ContextLoaderListener </listener-class> </listener> <servlet> <servlet-name>CXFServlet</servlet-name> <display-name>CXF Servlet</display-name> <servlet-class>org.apache.cxf.transport.servlet.CXFServlet</servlet-class> <load-on-startup>1</load-on-startup> </servlet> <servlet-mapping> <servlet-name>CXFServlet</servlet-name> <url-pattern>/WS/*</url-pattern> </servlet-mapping>Passons à la configuration Spring : - Importer les fichiers de CXF - Déclarer l'implémentation du service Web
<?xml version="1.0" encoding="UTF-8"?> <beans xmlns="http://www.springframework.org/schema/beans" xmlns:xsi="http://www.w3.org/2001/XMLSchema-instance" xmlns:jaxws="http://cxf.apache.org/jaxws" xmlns:context="http://www.springframework.org/schema/context" xsi:schemaLocation="http://www.springframework.org/schema/beans http://www.springframework.org/schema/beans/spring-beans-3.1.xsd http://cxf.apache.org/jaxws http://cxf.apache.org/schemas/jaxws.xsd http://www.springframework.org/schema/context http://www.springframework.org/schema/context/spring-context-3.1.xsd"> <import resource="classpath:META-INF/cxf/cxf.xml" /> <import resource="classpath:META-INF/cxf/cxf-extension-xml.xml" /> <import resource="classpath:META-INF/cxf/cxf-servlet.xml" /> <context:component-scan base-package="com.elmaroufy.testcxf" /> <jaxws:endpoint id="additionWS" implementor="com.elmaroufy.testcxf.AdditionWS" address="/AdditionWS" /> </beans>3. Les classes Java La classe d'implémentation du service Web annoté avec l'annotation JAX-WS @WebService et l'annotation Spring @Service
package com.elmaroufy.testcxf; import javax.jws.WebMethod; import javax.jws.WebService; import org.springframework.beans.factory.annotation.Autowired; import org.springframework.stereotype.Service; @WebService @Service public class AdditionWS { @Autowired AdditionService additionService; @WebMethod public int somme(int a, int b) { return additionService.somme(a, b); } }Et la classe métier
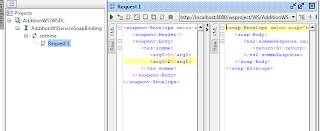
package com.elmaroufy.testcxf; import org.springframework.stereotype.Service; @Service public class AdditionService { public int somme(int a, int b) { return a+b; } }Votre WSDL généré peut être accessible via l'URL : http://serveur:port/context/WS/AdditionWS?WSDL et voici ce que donne un Test avec SoapUI :

Aucun commentaire:
Enregistrer un commentaire